Sometime this winter I started to get frustrated by the lack of pockets and general ability to organize any of my commuting crap in my current panniers. I've got a set of cheapie Nashbar panniers that are large and generally do a good job of getting my things from point A to point B. But since they're just one big cavity, all the small items tend to fall to the bottom. So when I need stuff like my work ID, metropass, cell phone and bike tools I often end up with everything I'm carrying strewn about on the sidewalk as I dig for it. Back in February I took a picture of all the crap that was living in my bag on a more or less permanent basis.

A bill, a Barnes & Noble gift card, a loose credit card, gum, various business cards, first aid kit, pump, two balaclavas, two sets of gloves, goggles, u-lock, tags from the newer balaclava, two belts (brown & black), various plastic silverware, three different tubes, and various small items. I needed to stop the madness.
I've been shopping about for a new bag, but couldn't find quite what I wanted. So on a whim Tuesday night I went shopping. First stop was the luggage section of TJ Maxx. After browsing several potential candidates I found a blue bag for $15.

Next was Home Cheapo. I spent $8 on some bungee cords and various small hardware bits. I brought all the goodies home and went to work.

First I got some 1/4" plywood that I had lying around the garage and traced the outline of the bag on it. I cut it to size with a jig saw and fitted it into the rear pocket of the bag, trimming until it fit just so.

To get the right location, I first rigged the bag so it would hang on my rear rack. Then I clipped a shoe in to the pedal and checked for heel strike. Once I had a location that was far enough back I marked two spots with a sharpie. I took a drill and drilled holes through the bag and the plywood. Then I inserted screws through the holes. On the outside I attached some corner brackets to the screws to act as hooks.

One they were attached I used a vice grip to bend the angle brackets into more of a hook shape. I fine tuned this until they went on and off the rack easily.

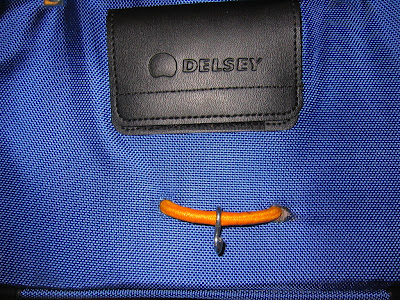
The final part was the retention system. The bungee cords I bought have hooks at both ends, and are adjustable. This made it super easy. I drilled two more holes in the bag and plywood, this time closer together at the bottom. I ran the bungee through these and attached an S-hook. Here's how it looks from the outside.
On the inside I used a coping saw to cut two notches at the top of the plywood panel for the hooks to fit into. This prevents them from sliding around.

I adjusted the tension on the bungee so it would work with my rack. Badda bing, thats' it. I used the new bag on my commute Wednesday and Thursday with no problems. I was even lucky enough to get caught in the rainstorm on Wednesday to test the bag's weather resistance. It rained pretty hard on the ride home, but only for about 15 minutes. Everything in the bag remained dry, but I have a feeling that things would start to get soggy if it was a sustained downpour. I would label this as "water resistant."


